MSI P67A-GD65 Intel Socket 1155 Motherboard Performance Review
MSI P67A-GD65 Motherboard UEFI BIOS

The first page of the new Click BIOS in the MSI P67A-GD65 gives you five different sections that you can head to. Settings, Game, OC, Utility, and Green Power, each of these will take you deeper into the BIOS into their respective catagories. So lets follow the BIOS down the rabbit hole and see how far we can go.

The Settings brings you to a page with an additional six options. We have the system status, Advanced, M-Flash, Security, Boot, and the Save and Exit option.

The system status page allows you to set the date and time as well as showing which drives you have plugged into each port. In this case we only have one SSD installed on the MSI P67A-GD65. We can also see details of the processor, BIOS, and total memory installed into the system.

The advanced page gives you access to several more sub pages. Including PCI Subsystem Settings, ACPI Settings, Integrated Peripherals, USB Configuration, Super I/O configuration, Hardware Monitor, Power Management Setup, and the Wake Up Event Setup.

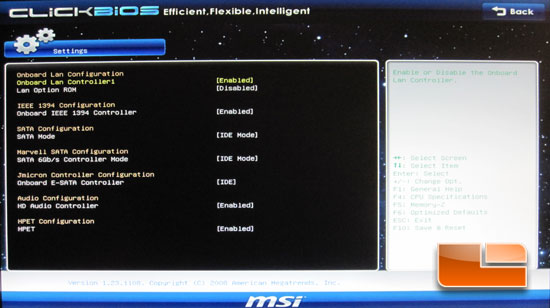
The Integrated Peripherals page will let you enable or disable the various peripherals like the onboard LAN, Firewire, and Audio. We can also set the modes of the SATA ports between IDE, AHCI, RAID, or disable them alltogether.

The USB Configuration allows you to enable or disable the USB ports on the MSI P67A-GD65.

Ever since I nearly cooked a CPU by not plugging in the CPU fan, the Hardware Monitor is quite possibly my favorite page within the BIOS. Here we can verify that our fans are working and that the CPU is properly cooled. You can also see what the various voltages are currently at.

M-Flash gives you the capability of flashing the BIOS from within the BIOS. Some companies give you the ability to flash through Windows, but ever since I bricked a motherboard when windows hung I have always run BIOS updates through the BIOS and haven’t had any issues. Being such a new chipset and new board we have had several BIOS revision installed on the MSI P67A-GD65, all of them have been installed through the M-Flash utility and it has worked flawlessly every time.

The Security section of the MSI P67A-GD65 allows you to set the various passwords and other security settings.

Under the Boot section of the settings we can set the boot order for the MSI P67A-GD65.

Here is where the overclocking magic happens. This image and the following image show you all of the settings available for tweaking all things CPU related.

The MSI P67A-GD65 has no shortage of voltage available for the system components. Setting the voltages to the maximum allowed we were able to have 1.8 Volts for the CPU Vcore, 1.55 for the CPU IO, 2.464 Volts for the DRAM and 1.505 Volts for the System Agent Voltage.

The MSI P67A-GD65 allows you to store six different overclocking profiles.

The CPU specifications on the OC page of the BIOS show you all of the information about you second generation Intel Core processor of choice.

Here we can see all of the technologies supported by this particular Intel Core i5 2500K processor.

The MSI P67A-GD65 will show the the SPD settings of your choice of memory, in this case we have DIMMs installed into DIMM slot 2 and DIMM slot 4.

The final selection of the OC page allows you to enable or disable the various CPU technologies.

The Utilities page gives you access to several features that would be helpful in the event of a system failure. We have a memory test, live update, HDD Backup, and Boot Screen.

The memory test is a simple and quick test, though I’m not sure how it compares to some of the other memtests out there that you can run for hours at a time. It may be a good initial indicator when trouble shooting a system that is having issues.

The boot screen allows you to import a picture of your choosing for the boot process.

Comments are closed.