Free Homebrew VoIP with Google Voice and Intel Atom
Tweaking Asterisk to Support the SPA-3102
Now that the SPA-3102 is configured, we need to tweak some more settings. First, we need to create a new SIP Trunk. Under the Setup tab, click Trunks and ‘Add SIP Trunk’. For ‘Outbound Caller ID’, enter your 10-digit traditional phone number from your DSL provider. If you have dry-DSL, you likely still have a phone number on your bill simply for the purposes of calling 911. Enter that number. For ‘Max Channels’, enter 1. Under the ‘Outgoing Settings’ section, set the ‘Trunk Name’ field to ‘PSTN’. Then in the ‘PEER’ field, enter the following, but not the comments:
auth=md5
context=from-internal
dtmfmode=rfc2833
fromuser=asterisk
host=192.168.0.4 <– the IP address of your SPA-3102
insecure=very
port=5061
secret=999999 <– use the secret from extensions 99, 199, 701
type=peer
username=asterisk
Save, and then click on Apply Config Changes and Continue.
Next we need to create a new Outbound Route, so under the Setup tab, click ‘Outbound Routes’. You will already have a blank form to create a new route, so enter the following:
Route Name: OutPSTN
Dial Patterns: 911
Trunk Sequence: SIP/PSTN
Once you save this outbound route, we want to re-order the routes on the right side of the screen by clicking on the blue up and down arrows so that GoogleVoice is the first route, then our OutPSTN route is second. The rest of the routes can stay in their original orders. Then click on Apply Config Changes and Continue.
Now we need to edit a file called extensions_custom.conf. Under the Tools tab, click on ‘Config Edit’. Then click on the file named ‘extensions_custom.conf’. Under the section ‘[from-internal-custom]’, enter the following code:
;next extension (99) is to handle incoming PSTN calls
include => custom-recordme-code
exten => 99,1,GotoIf($[“${CALLERIDNUM:0:2}” = “00”]?2:3)
exten => 99,2,SetCIDNum(${CALLERIDNUM:2})
exten => 99,3,SetMusicOnHold(default)
exten => 99,4,Answer
exten => 99,5,Wait(1)
exten => 99,6,Background(custom/welcome)
exten => 99,7,DigitTimeout,2
exten => 99,8,ResponseTimeout,2
exten => t,1,Answer
exten => t,2,Wait(1)
exten => t,3,Background(pls-hold-while-try)
exten => t,4,Dial(SIP/701,20,m)
exten => t,5,VoiceMail(701@default)
exten => t,6,Hangup
exten => i,1,Answer
exten => i,2,Wait(1)
exten => i,3,Playback(wrong-try-again-smarty)
exten => i,4,Goto(99,5)
Then at the bottom of the file enter the following:
[custom-recordme-code]
exten => 456,1,Playback(custom/record-msg)
exten => 456,2,Wait(2)
exten => 456,3,Record(/tmp/asterisk-recording:gsm)
exten => 456,4,Wait(2)
exten => 456,5,Playback(/tmp/asterisk-recording)
exten => 456,6,Wait(2)
exten => 456,7,Hangup
Then click update to save the file and ‘Re-Read Configs’ to have your changes take effect.
Adding a Softphone:
In order to test extension to extension calling, you can install a softphone on your computer. Say we want to setup our computer to use extension 705. Under Setup, go to Extensions and click on extension 705. You may want to update the Display Name with a more descriptive name, like ‘Computer1’. Take note of the secret value or change it to what you want to use. Don’t forget to Apply Config Changes and Continue if you changed something.
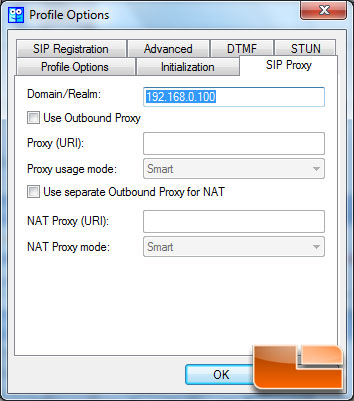
We installed SJPhone on our computer. With the program running, we went to the options dialog. Here we went to the Profile tab and created a new profile. Enter your Asterisk Server IP for the ‘Domain/Realm’ field and say OK. You will then be prompted for your Username and Password and you will want to enter the extension number 705 as the user and the secret as the password.

You should now be online with your softphone and can now try dialing ‘7-0-1’ and your other phone should ring! Now that we have extension to extension calls working, it is time to work our Google Voice magic!

Comments are closed.