Kingston HyperX 8GB 1866MHz PnP Memory Kit For Notebooks
Sandy Bridge Notebooks Get HyperX Treatment

Kingston today announced the new HyperX Plug and Play (PnP) notebook memory module series. This series is aimed at high-performance computing enthusiasts that are looking to get the most from their second generation Intel Core i5 and i7 ‘Sandy Bridge’ mobile processor. You see, when Intel came out with the Huron River platform (Intel HM65 Express Chipsets) the only certified JEDEC settings were 1066Mhz and 1333MHz. So, when most of these notebooks came out in Q1 2011 they were all fitted with 1333MHz memory kits. Well, the JEDEC board recently released JEDEC-compliant settings allowing for 1600MHz and 1866MHz frequency support on these platforms. The Intel ‘Sandy Bridge’ mobile processor family can easily support these faster memory speeds, so it was only a matter of time until memory companies came out with 1600MHz and 1866MHz modules that had the proper SPD settings to Plug and Play with these new notebooks. The first company that we know of to do this is Kingston with their famed HyperX memory series.
| Part Number | Capacity & Features | Application | Price |
| KHX1600C9D3P1K2/8G | 8GB 1600MHZ CL9-9-9 @ 1.5V | Desktop | $93 |
| KHX1600C9D3P1K2/4G | 4GB 1600MHZ CL9-9-9 @ 1.5V | Desktop | $49 |
| KHX1600C9S3P1K2/8G | 8GB 1600MHZ CL9-9-9 @ 1.5V | Notebook | $87 |
| KHX1600C9S3P1K2/4G | 4GB 1600MHZ CL9-9-9 @ 1.5V | Notebook | $55 |
| KHX1866C11S3P1K2/8G | 8GB 1866MHZ CL11-11-11 @ 1.5V | Notebook | $129 |
| KHX1866C11S3P1K2/4G | 4GB 1866MHZ CL11-11-11 @ 1.5V | Notebook | $80 |
Kingston is releasing not one or two, but six new memory kits in this series today! Two of the HyperX Plug and Play kits are aimed for desktop users and are full sizes 204-pin DDR3 modules. These modules have a D in the part number and are ideal for desktop users that don’t want to mess with BIOS settings. The other four modules have an S in the part number and that stands for SO-DIMM. These parts are obviously aimed at notebook users and Kingston offers kits in 4GB and 8GB capacities at either 1600 MHz or 1866 MHz clock frequencies.

The kit that Legit Reviews is going to be looking at today is theKHX1866C11S3P1K2/8G and that is the flagship memory kit in the Kingston HyperX Plug and Play memory series. This 8GB DDR3 kit runs at 1866MHz with 11-11-11-32 timings with a command rate of 2T at 1.5V. This kit has a suggested retail price of $163, which isn’t that bad compared to how expensive memory has been in the past. We remember a couple years ago when a 4GB DDR3 1600MHz SO-DIMM was nearly a thousand dollars since it was brand new.

The Kingston HyperX Plug and Play 8GB DDR3 1866MHz memory kit features silver colored heat spreaders that have ‘vent’ holes located along the top edge for an aggressive appearance. Looking at a 204-pin DDR3 SO-DIMM laptop memory kit is only so much fun, so let’s install the kit and see how it performs!

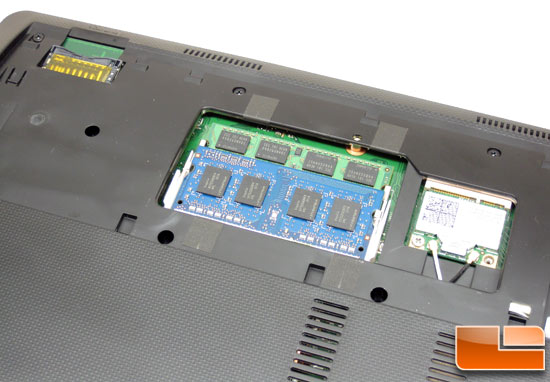
Installing the memory modules into the ASUS K53E notebook was very
simple as we just needed to remove two Philips head screws, take out the two old
modules and insert the two new Kingston HyperX SO-DIMM modules. We were a little shocked to find our ASUS K53E notebook that came with 6GB of DDR3 memory shipped in a 2GB + 4GB configuration and both modules were made by different brands and were different colored. Not the prettiest of memory installations, but it’s hidden by the plastic back cover and no one will see it.

We were also a little shocked to see totally different memory IC’s on them as the Hynix 2GB module featured Hynix ICs and the Samsung 4GB module featured Samsung ICs. Nothing like running mixed and matched memory modules on a brand new notebook! The Kingston HyperX Plug and Play modules are identical in every sense and each module is 4GB in density and clad with nice looking silver aluminum heat spreaders. With dual channel memory you’d think having two identical parts running in unison would be the best option.

Installing the new Kingston HyperX SO-DIMM modules back into the ASUS K53E was simple as all you need to do is line up the modules properly in the socket and push them down in order for the clip to hold them in place. When doing this we did notice that the fit was tighter with the HyperX modules due to the extra thickness of the four metal heat spreaders. In fact the brackets weren’t fully able to clip the modules, but they had enough of a grasp on them to prevent them from popping out of place. We did a few shake and drop tests (onto a couch from a couple feet in the air) and they were secure.

Comments are closed.