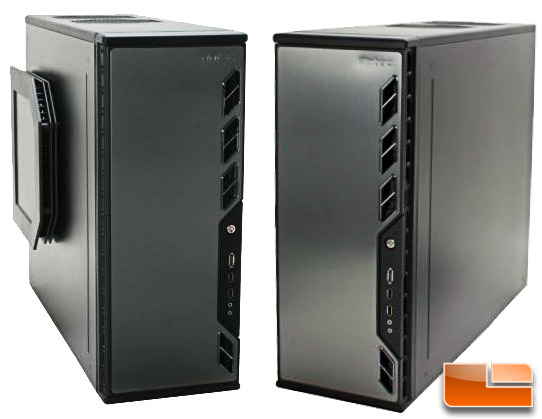
Antec P193 Mid Tower ATX Case Review
Antec P193 Mid Tower Case Introduction
Antec is well respected in the industry for their chassis (and other products), and as well they should. They are rapidly approaching their 25th anniversary so they have been around long enough to know what their customers want and how to deliver on that expectation. Case in point (no pun intended), their P193 mid tower chassis. The successor of the P190 released in 2007, Antec has made several changes with the P193 which should make this iteration a better all-around case for the enthusiast. Found online for $175 (without a PSU), it’s roughly $100 cheaper than the P190 was but this isn’t exactly a budget case so we’ll bear that in mind during our evaluation.

Like the P190, the P193 is a heavy case for its size. While slimmed down a bit from its predecessor, it still tips the scales at over 35lbs. Once you remove the side panels, you can tell where a lot of the weight comes from as the side panels are portly themselves. Made mostly of steel with some aluminum and plastic thrown in, the P193 is very solid and stout. The exterior design is elegant, not flashy, with an aluminum finish on the front door as well as on the side panel fan protuberance.

Being a mid tower case its overall dimensions aren’t huge, but packaged in foam sleeves and inside another box for extra protection, the exterior box is rather large and unwieldy. That said, make a note to yourself if Grandma is accepting delivery from the courier on your behalf. She’s going to need some assistance.

Before we get too far, have a peek at the features and specifications as listed by Antec. If you are familiar with the P190 case, you’ll see a few differences along with some similarities.
- Dual chamber design isolates heat and noise; the power supply resides in a separate chamber to isolate heat and reduce system noise.
- Fits heatsink fans up to 140mm: the P193’s superior cooling eliminates the need for larger heatsinks.
- No power supply included
- Power supply option: comes with a power supply mounting adapter to mount either a standard size power supply or Antec’s exclusive CP Series power supply.
- Innovative two-layer, sound-deadening side panels (steel, polycarbonate) and a three-layer front door (aluminum, plastic, aluminum) dampen noise and ensure Quiet Computing.
- 11 drive bays
- External 4 x 5.25″; 1 x 3.5″
- Internal 6 x 3.5″ for HDD
- 1 rear (standard) 120mm x 25mm exhaust TriCool fan
- 2 top (standard) 140mm x 25mm exhaust TriCool fan
- 1 lower front chamber (optional) 120mm fan for HDD
- 1 side (standard) 200mm fan for dual graphics cards
- 1 upper front (optional) 120mm fan for HDD
- 1 middle (optional) 120mm fan for graphic cards
- 2 x USB 2.0
- 1 x eSATA
- Audio In and Out (HDA and AC?97 compatible)
- 20.25″ (H) x 8.1″ (W) x 23.25″ (D)
- Actual clearance needed for width is 9.5″ due to the side panel fan.
- 51.4 cm (H) x 20.5 cm (W) x 59 cm (D)
- 13.25″ (H) x 25.8″ (W) x 28.75″ (D)
- 33.7 cm (H) x 65.5 cm (W) x 73 cm (D)
When we unwrapped this beauty, we found a box inside of the case itself that held all of the parts and bits for the build. The box is large but the contents only make up a small portion of the size and the rest is empty as it is sized to fit snugly in the interior space.

There are lots of bits to keep track of and Antec was generous with the parts they provided. Included are the drive rails, cable ties, fan clips, screws and mounts for the motherboard as well as screws for mounting the hard drives. Also present are keys for locking the case (more on this later) and plastic mystery pieces which, after sifting through the paperwork, appear to be used for stabilizing large video cards.

Included was a multilingual overview sheet which points you to the web for a more detailed manual along with a warranty sheet, pin assignment layout sheet and a few flyers that show how to mount an optional fan with the included clips and the aforementioned GPU stabilizer. These are displayed in the image below.

The online manual provides some good information such as the polarity of the motherboard header wires, etc. but most seasoned builders shouldn’t need much guidance. All set for a closer look?

Comments are closed.